从零开始写一个极简版Hookmark
#文件管理 #DIY工具
1.Hookmark 最让我惊艳的点
在我们写笔记时,难免会引用到一些文件,以前的话,我都是用的文件的绝对路径的 file 协议链接。
操作流程就是:
- 先在 Finder 拷贝完整路径,例如:
/Users/yutianran/Documents/关注圈 影响圈 知乎.jpg
- 再在 Chrome 地址栏中粘贴,重新拷贝它进行了空格和中文转码后的链接
- 最后在笔记工具中粘贴这个 file 协议的链接
file:///Users/yutianran/Documents/%E5%85%B3%E6%B3%A8%E5%9C%88%20%E5%BD%B1%E5%93%8D%E5%9C%88%20%E7%9F%A5%E4%B9%8E.jpg
但是这样就存在一个问题:如果被引用的文件改名了,或者被移动了位置,那我就很难再通过笔记直接访问到它。
而 Hookmark 最舒服的地方就是可以用快捷键快速创建一个 md 链接,例如:[关注圈 影响圈 知乎.jpg](hook://file/XQsipOANE?p=eXV0aWFucmFuL0RvY3VtZW50cw==&n=%E5%85%B3%E6%B3%A8%E5%9C%88%20%E5%BD%B1%E5%93%8D%E5%9C%88%20%E7%9F%A5%E4%B9%8E%2Ejpg),最神奇的是,之后这个文件,无论是改名还是移动,都可以通过这个链接访问到。
2.开始模仿 Hookmark
Hookmark 只能在 Mac 系统上使用,我仔细研究了 Mac 文件系统的替身、软连接、硬连接的区别以后,我觉得 Hookmark 应该主要就是用 Mac 系统的替身来实现的。
下面梳理一下我想要实现的流程:
1-先用 Mac 系统自带的 Automator 来获取当前选中的文件的路径
2-将路径传递给一个本地开启的 Web 服务,这里我准备用 Python 的 FastApi 实现
3-根据原始路径,在本机的固定目录下创建一个替身文件
4-为替身文件创建一个 file 协议链接,以后都可以通过替身文件去访问原始文件
针对上面的示例路径,我最后生成的链接是这样的:[关注圈 影响圈 知乎](file:///Users/yutianran/Documents/.link/%E5%85%B3%E6%B3%A8%E5%9C%88%20%E5%BD%B1%E5%93%8D%E5%9C%88%20%E7%9F%A5%E4%B9%8E.jpg-4f134d0946),同样不怕改名和移动
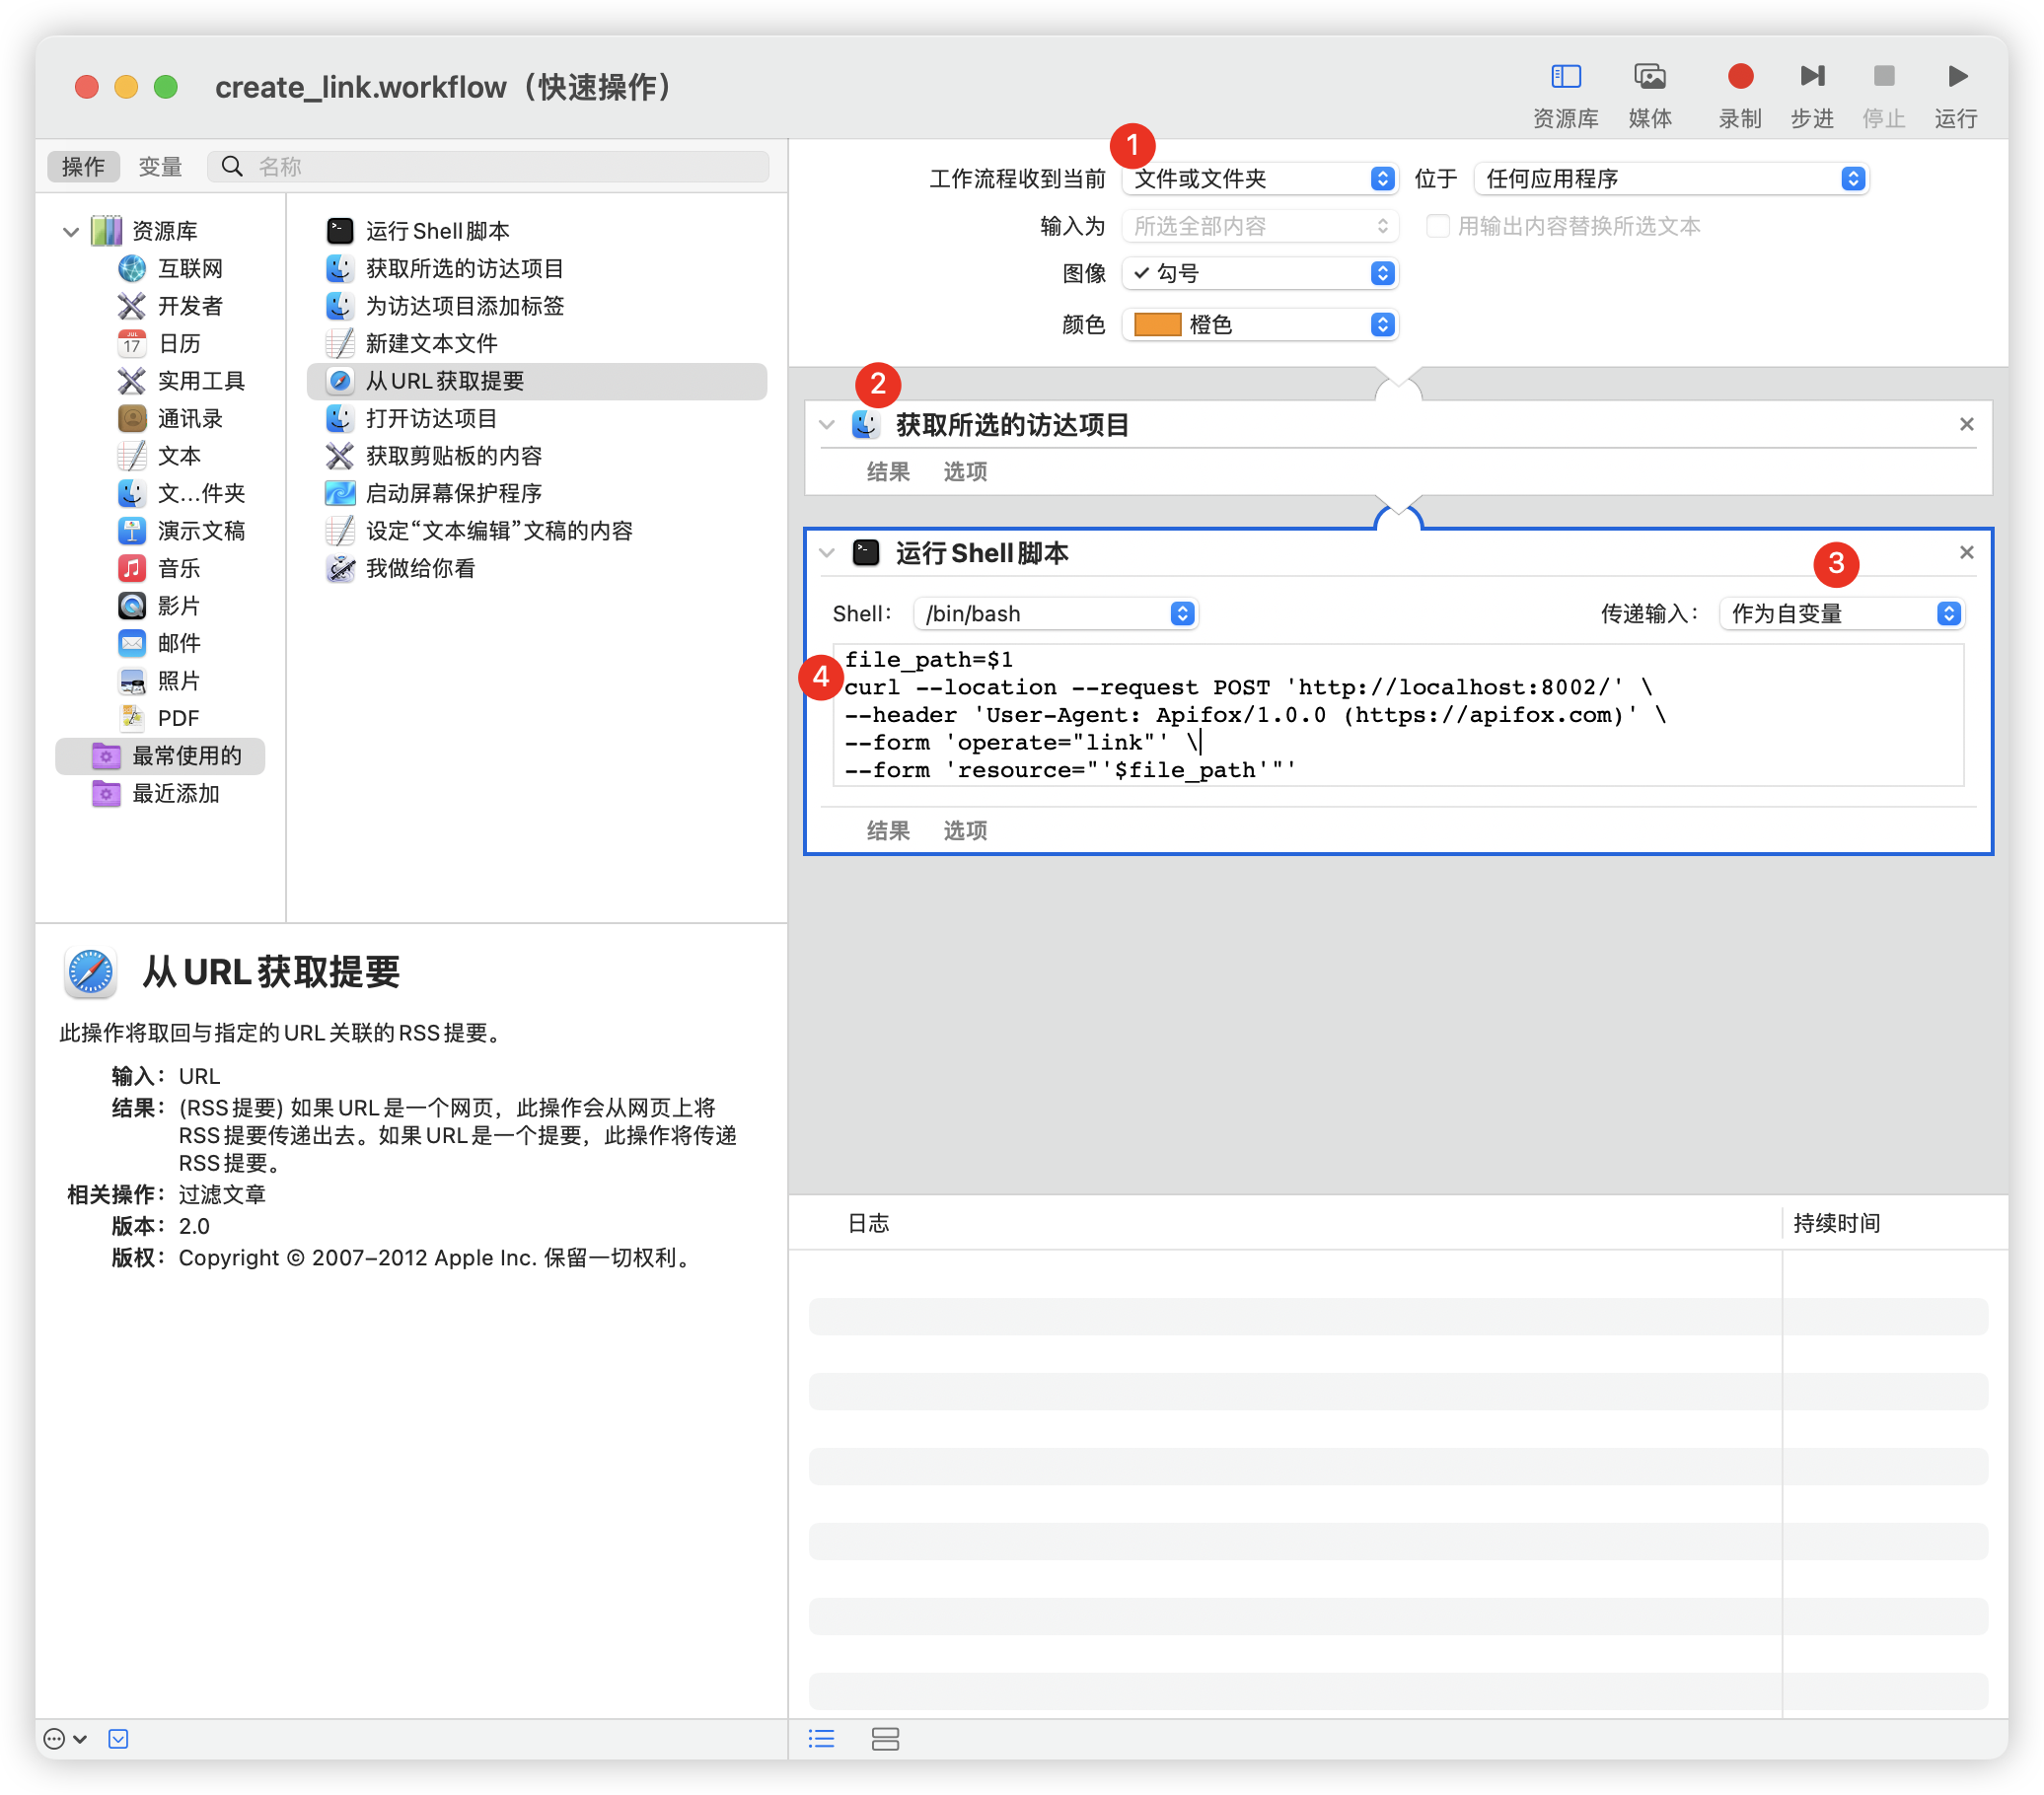
3-自定义 Automator
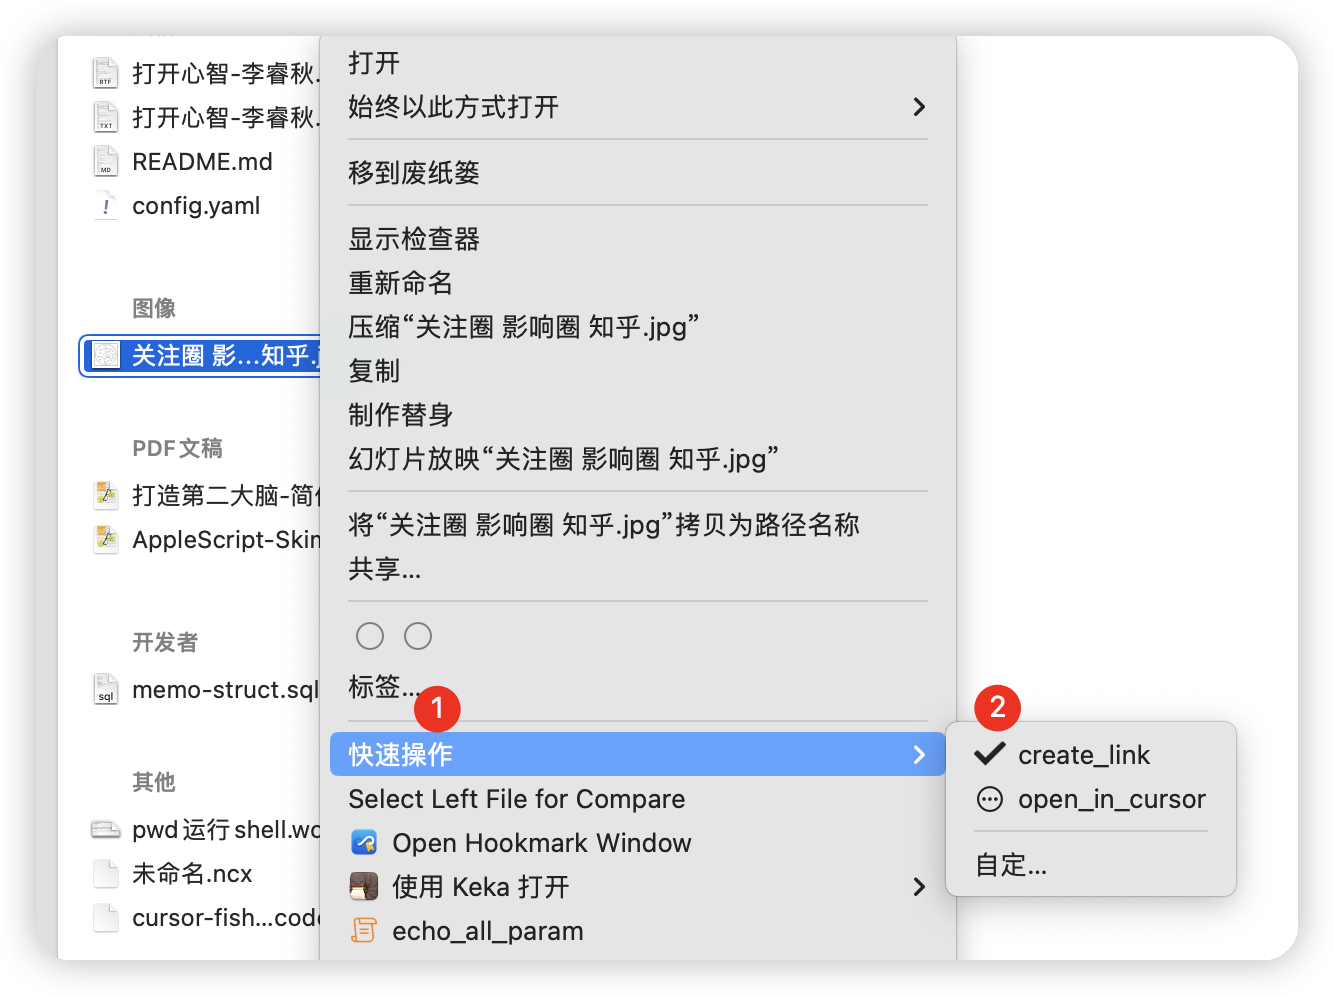
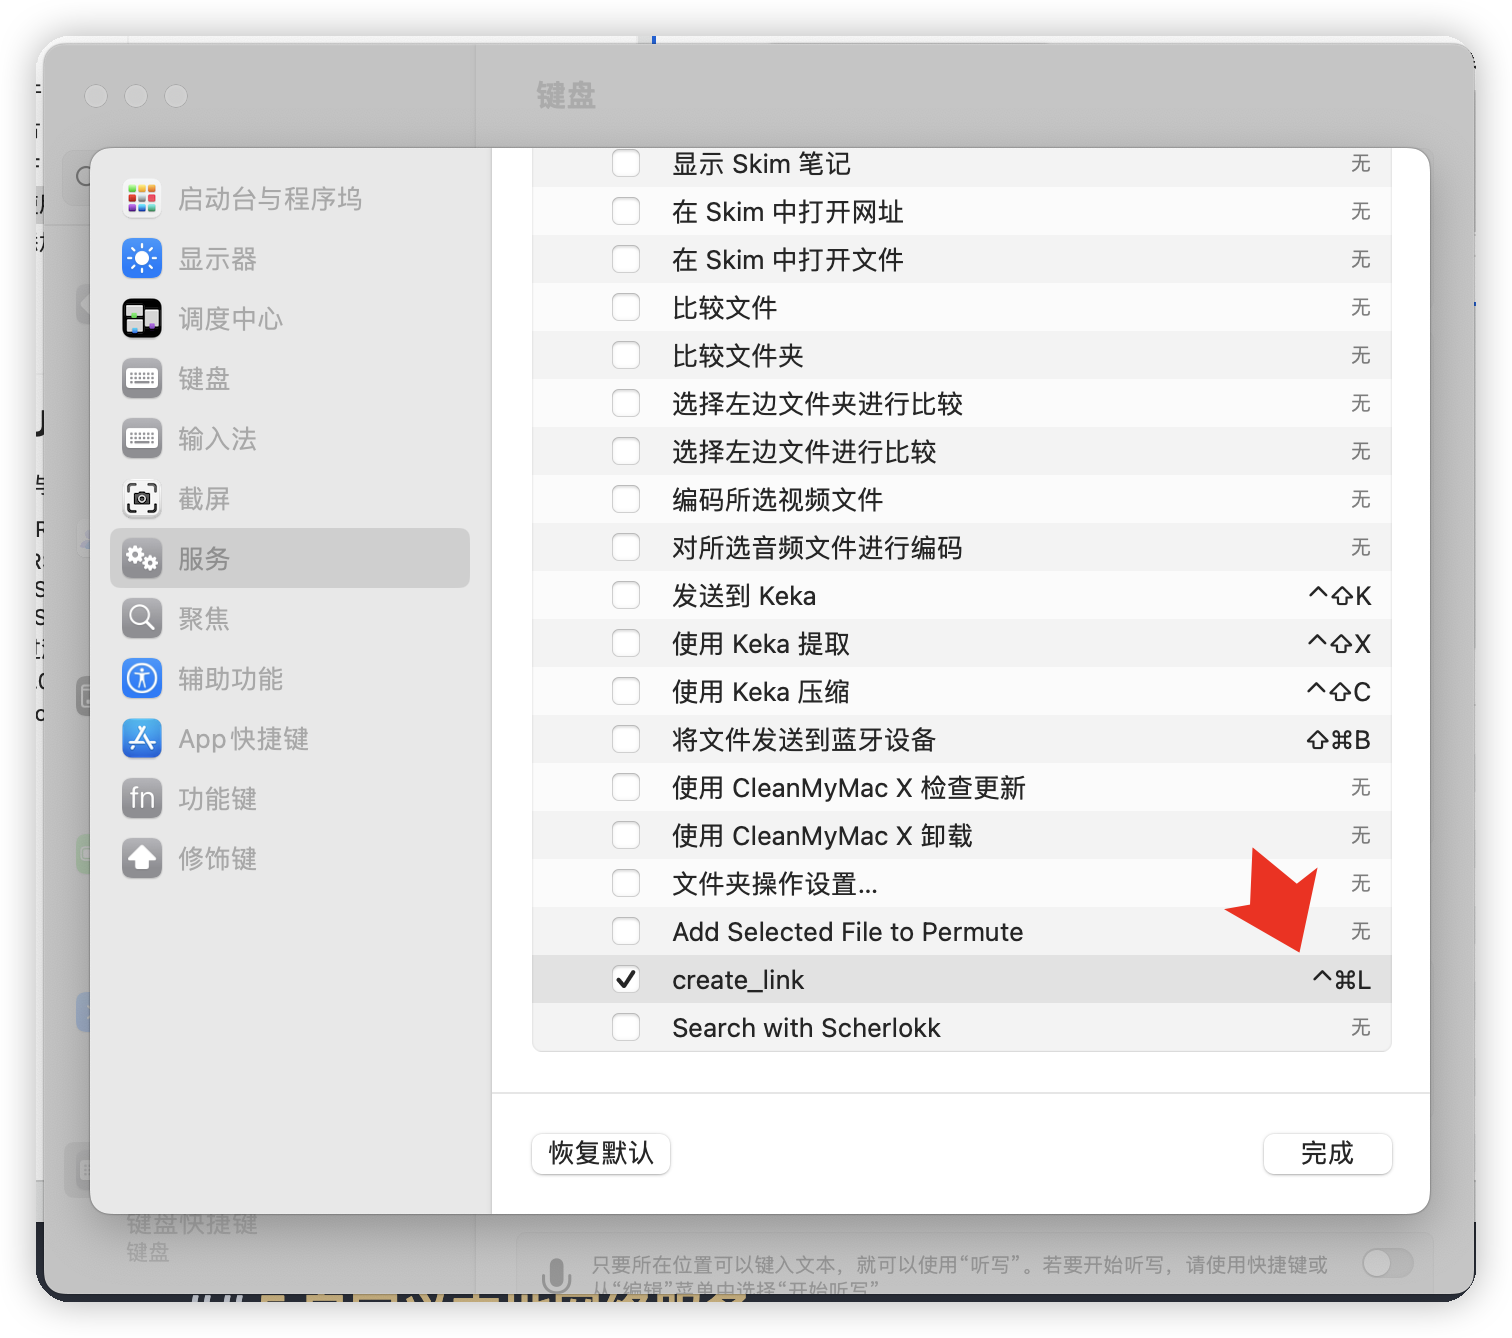
在 Automator 中新建文稿,选择文稿类型为:快速操作,这样方便我们在 Finder 下可以右键看到这个服务, 不过每次要去快速操作里面找也挺麻烦的,所以可以去系统设置里面给它设置一个快捷键:
键盘-键盘快捷键-服务-文件和文件夹-create_link

这个 create_link.workflow 文件路径在~/Library/Services/
 workflow 本身其实啥也没干,就是获取文件路径参数,然后发起本地网络请求
1
2
3
4
5
|
file_path=$1
curl --location --request POST 'http://localhost:8002/' \
--header 'User-Agent: Apifox/1.0.0 (https://apifox.com)' \
--form 'operate="link"' \
--form 'resource="'"$file_path"'"'
|
5.自定义本地网络服务
这个本地网络服务同样啥也没干,就是接收文件路径参数,然后调用了 alias_util 工具类,最后将结果拷贝到系统剪切版
 1
 2
 3
 4
 5
 6
 7
 8
 9
10
11
12
13
14
15
16
17
18
19
20
21
22
23
24
25
26
27
28
29
30
31
32
33
34
35
36
37
38
39
40
41
42
43
44
45
46
47
48
49
50
51
52
53
54
55
56
57
58
59
60
61
62
63
64
65
66
67
68
69
70
71
72
73
74
75
76
77
78
79
80
81
82
83
84
85
86
87
88
89
90
91
92
93
94
95
96
97
98
99
|
from fastapi import FastAPI, Response, Form, HTTPException, UploadFile, File
import uvicorn
import subprocess
import pyperclip
import os

import alias_util


app = FastAPI()


@app.get("/{operate}/{resource}")
def do_get(operate: str, resource: str):
    try:
        result = process(operate, resource)
        return Response(content=result, media_type="text/html")
    except BaseException as e:
        print(e)
        raise HTTPException(status_code=400, detail=str(e))


@app.post("/")
def do_post(operate: str = Form(...), resource: str = Form(...)):
    try:
        result = process(operate, resource)
        return Response(content=result, media_type="text/html")
    except BaseException as e:
        print(e)
        raise HTTPException(status_code=400, detail=str(e))


@app.post("/upload/")
async def upload(file: UploadFile = File(...)):
    return {"filename": file.filename}


# 核心的中转方法
def process(operate: str, resource: str):
    print(f"process operate: {operate} resource: {resource}")
    func_map = {
        "link": link,
        # "proxy":proxy,
        # "alias": alias,
        # "origin": origin,
        # "read": read_resource,
        # "open": open_resource,
    }
    if operate in func_map:
        return func_map[operate](resource)
    else:
        raise ServerException("Invalid Request")


class ServerException(Exception):
    pass


def execute_cmd(shell_command):
    print(f"shell_command: {shell_command}")
    process = subprocess.run(
        shell_command,
        shell=True,
        check=True,
        stdout=subprocess.PIPE,
        stderr=subprocess.PIPE,
    )
    return_code = process.returncode
    output = process.stdout.decode("utf-8")
    error = process.stderr.decode("utf-8")
    print(f"return_code: {return_code}")
    print(f"output: {output}")
    print(f"error: {error}")
    return return_code, output, error


def link(resource):
    result = alias_util.create_alias(resource)
    # 拷贝到系统剪切版
    pyperclip.copy(result)
    return result
    # shell_command = f'sh /Users/yutianran/MyGithub/MyVSCode/test-fastapi/script/automator_link.sh "{resource}"'
    # print(f"shell_command: {shell_command}")
    # return_code, output, error = execute_cmd(shell_command)
    # if return_code == 0:
    #     pyperclip.copy(output)
    #     return output
    # else:
    #     raise ServerException(error)


def main():
    print("start main app_automator ...")
    print("http://localhost:8002/")
    uvicorn.run("app_automator:app", host="0.0.0.0", port=8002, reload=True)


if __name__ == "__main__":
    main()
|
4.核心的 alias_util 工具类
最终都是这个工具类在负重前行,核心点就是用 AppleScript 来创建替身文件了,用 ln mv 等命令行是不行的
这个 AppleScript 的 api 太难找了,我问了好多次 GPT 才总算试验出来了
 1
 2
 3
 4
 5
 6
 7
 8
 9
10
11
12
13
14
15
16
17
18
19
20
21
22
23
24
25
26
27
28
29
30
31
32
33
34
35
36
37
38
39
40
41
42
43
44
45
46
47
48
49
50
51
52
53
54
55
56
57
58
59
|
#!/usr/bin/env python

import os
import sys
import urllib.parse
import hashlib
import subprocess


# 创建替身文件
def create_alias(file_path):
    print(f"file_path: {file_path}")
    file_name = os.path.basename(file_path)
    file_nam = os.path.splitext(file_name)[0]
    file_ext = os.path.splitext(file_name)[1]

    alias_folder_path = os.path.expanduser("~/Documents/.link/")
    print(f"alias_folder_path: {alias_folder_path}")

    # 如果alias_folder_path文件夹不存在就创建
    if not os.path.exists(alias_folder_path):
        os.makedirs(alias_folder_path)

    hash_value = hashlib.md5(file_path.encode()).hexdigest()
    alias_file_name = f"{file_name}-{hash_value[:10]}"
    print(f"alias_file_name: {alias_file_name}")

    alias_file_path = os.path.join(alias_folder_path, alias_file_name)

    # 定义要执行的AppleScript代码
    applescript_code = f"""
    tell application "Finder"
        if not (exists POSIX file "{alias_file_path}") then
            set alias_name to "{alias_file_name}" -- 替身文件名
            make new alias at POSIX file "{alias_folder_path}" to POSIX file "{file_path}" with properties {{name:alias_name}}
        end if
    end tell
    """
    # print(applescript_code)
    subprocess.run(["osascript", "-e", applescript_code], check=True)
    print(f"alias_file_path: {alias_file_path}")

    urlencode_name = urllib.parse.quote(alias_file_name)
    print(f"urlencode_name: {urlencode_name}")

    # 替身文件的file协议
    file_schema_link = f"file://{alias_folder_path}{urlencode_name}"
    return f"[{file_nam}]({file_schema_link})"


def main():
    link = create_alias(
        "/Users/yutianran/MyGithub/MyVSCode/test-fastapi/MyHookMark流程梳理.md"
    )
    print(f"mdlink: {link}")


if __name__ == "__main__":
    main()
|
5.其它补充
最开始我是直接调用 shell 脚本文件来实现 alias_util 工具类的,但是不知道为啥直接运行好好的,通过 Automator 来调用它就一直不行,无奈放弃
后来改为直接调用 python 脚本,也是同样的问题,都是单独测试脚本文件是可以的,一集成到 Automator 里面就不行
最后只好用本地网络服务做了一下中转
不过后来发现其实加一层网络服务,有 2 个好处
- 方便我们用 Apifox 做测试,比如 Automator 里面内嵌的 curl 指令就是用 Apifox 自动生成的
- 方便我们用 pm2 来管理这个服务和它的日志
1
2
3
4
5
|
pm2 start my-hookmark/app_automator.py --interpreter python3 #启动服务
pm2 list #查看服务列表
pm2 logs app_automator #查看服务日志
pm2 stop app_automator #停止服务
pm2 delete app_automator #删除服务
|
参考资料
 不过每次要去快速操作里面找也挺麻烦的,所以可以去系统设置里面给它设置一个快捷键:
键盘-键盘快捷键-服务-文件和文件夹-create_link

 workflow 本身其实啥也没干,就是获取文件路径参数,然后发起本地网络请求